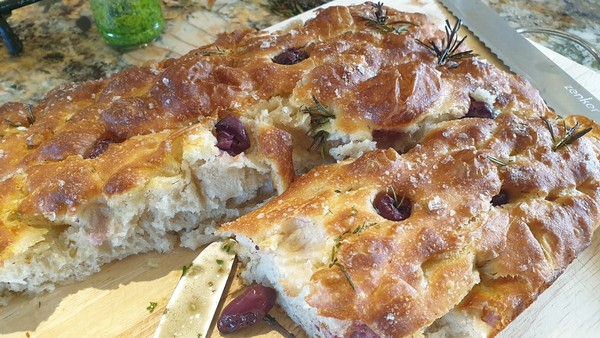
Best Ever Overnight Focaccia

This delightful homemade focaccia recipe yields a perfectly crispy and flavorful bread, ideal for any occasion.
Marthinus Strydom
Authentic Chimichurri
The Story
Focaccia is a traditional Italian flatbread that has its origins in ancient Rome, where it was known as “panis focacius,” a term derived from the Latin words “panis” (bread) and “focus” (hearth or fireplace). This simple yet versatile bread was initially baked on the hearth and used as a basic staple by Roman soldiers and travelers. Over time, the recipe evolved and spread throughout Italy, with each region developing its own variations and flavors. In Liguria, a coastal region in northwestern Italy, focaccia became particularly popular, often enriched with local olive oil, herbs, and sea salt, giving rise to the classic focaccia we know and love today.
More about Italy
Italy is one of those countries about which you probably have quite a number of preconceptions before you have put one foot into the country. A country of olive oil and mafia, pasta, wine and sunshine, roman ruins and renaissance palaces, Italy has a lot to offer its visitors. Although some of these images are appealing, it would be a shame if that was the only thing you come away with. Italy is certainly much more complex and interesting than that.

Subscripe to my Facebook page.
Subscripe to my Youtube channel.
© All recipes are copyright protected by TheCultureCook.com unless the recipe was adapated from another source. All recipes are uniquely crafted and adapted by TheCultureCook.com. Copyright of some or all of the text reside with the original author.
Ingredients
Method
Day One - Dough Preparation
1. Mix Ingredients: In a large mixing bowl, combine the warm water, instant yeast, honey, olive oil, and fine sea salt until well blended. Add the bread flour and mix until no dry flour remains. Cover with a cloth and let rest for 10 minutes at room temperature.
2. Stretch and Fold: After 10 minutes, perform a stretch and fold to develop the gluten. Wet your hand to prevent sticking, then grab a portion of dough from the 12 o’clock position, stretch it up and over to the 6 o’clock position. Repeat around the dough until it forms a rough ball. Let rest for 10 minutes and repeat the stretch and fold once more.
3. Rest and Rise: After the second stretch and fold, place the dough seam side down in the bowl. Drizzle with 1 tablespoon of olive oil and ensure the surface is covered. Cover the bowl with a reusable shower cap, lid, plastic wrap, or transfer to a Tupperware container. Let the dough rise in the fridge for 12-48 hours.
Day Two - Baking Day
4. Prepare Baking Tray: Prepare a 9” x 13” (22cm x 33cm) baking tray by lightly oiling it, then place a sheet of parchment paper on top. Drizzle 2-3 tablespoons of olive oil on the parchment and spread evenly.
5. Transfer Dough: Remove the dough from the fridge and gently release it from the bowl using a curved dough scraper. Transfer the dough to the prepared tray.
6. Fold Dough: Oil your hands and fold one side of the dough towards the middle. Repeat with the other side, then flip the dough so the seams are at the bottom and the smooth side is on top.
7. Second Rise: Cover the tray with another inverted tray or a plastic storage box to prevent drying. Let the dough rise for 1.5-2.5 hours, until it mostly fills the tray. If needed, gently stretch the dough to the edges of the tray.
Dimpling, Topping, and Baking
8. Preheat Oven: Preheat the oven to 220°C (430°F).
9. Dimple Dough: Drizzle the top of the dough with more olive oil. Oil your hands and press your fingers into the dough to create dimples. Be careful not to over-dimple and lose air pockets.
10. Add Toppings: Sprinkle flaky sea salt on top. Add desired toppings (e.g., olives, rosemary, cherry tomatoes, onions, jalapeños, cheese) by gently pressing them into the dimples. For oily toppings like pesto or chimichurri, omit the additional olive oil drizzle.
11. Bake: Bake the focaccia on the lowest oven rack for 18-22 minutes, until deeply golden brown. If your oven runs cooler, it may take up to 35 minutes. Adjust the oven temperature if needed for future bakes.
12. Cool: Let the focaccia cool in the pan for a few minutes, then transfer to a cooling rack to maintain a crispy bottom.
Enjoy your delicious homemade focaccia!
